Following the interest in John Morgan-Hosey’s report on the NRA Imperial CSR Match, veteran PR/CSR competitor Nigel Greenaway gives us some tips on shooting the Urban Contact Match
Civilian Service Rifle (CSR) shooting has had a core band of followers since the late 1990’s but recently there has been a dramatic rise in the numbers of shooters, particularly in the CSR Winter League with over 700 participants shooting in one or more matches during 2015. Perhaps the reason for the sudden rise in popularity – apart from the obvious fact that it is great fun – is a series of coaching courses run by the NRA’s Peter Cottrell. Peter is an expert rifle coach and winner of this year’s CSR League and National Championships. These coaching courses have gone a long way to removing some of the mystique or fear factor that have perhaps prevented some shooters from taking that first step in to CSR shooting.
I took part in a coaching session for the Urban Contact Match and am pleased to say that old dogs can learn new tricks. However, even old dogs like me can still make mistakes and I had a real howler at this year’s National Championships. So what lessons did I learn and what new equipment would I like to use to lessen the chance of making the same mistake twice?
The right way to shoot the Urban Contact Match
The NRA has invested in a turning-target range on Short Siberia and this allows civilian shooters to shoot the 40 round Urban Contact Match – a four stage event at 100, 75, 50 and 25 yards. Each stage requires ten rounds but adopting new techniques will extract better results as all the scoring rings are used on the Fig11 and Fig14 targets.
100 Yards Standing Supported
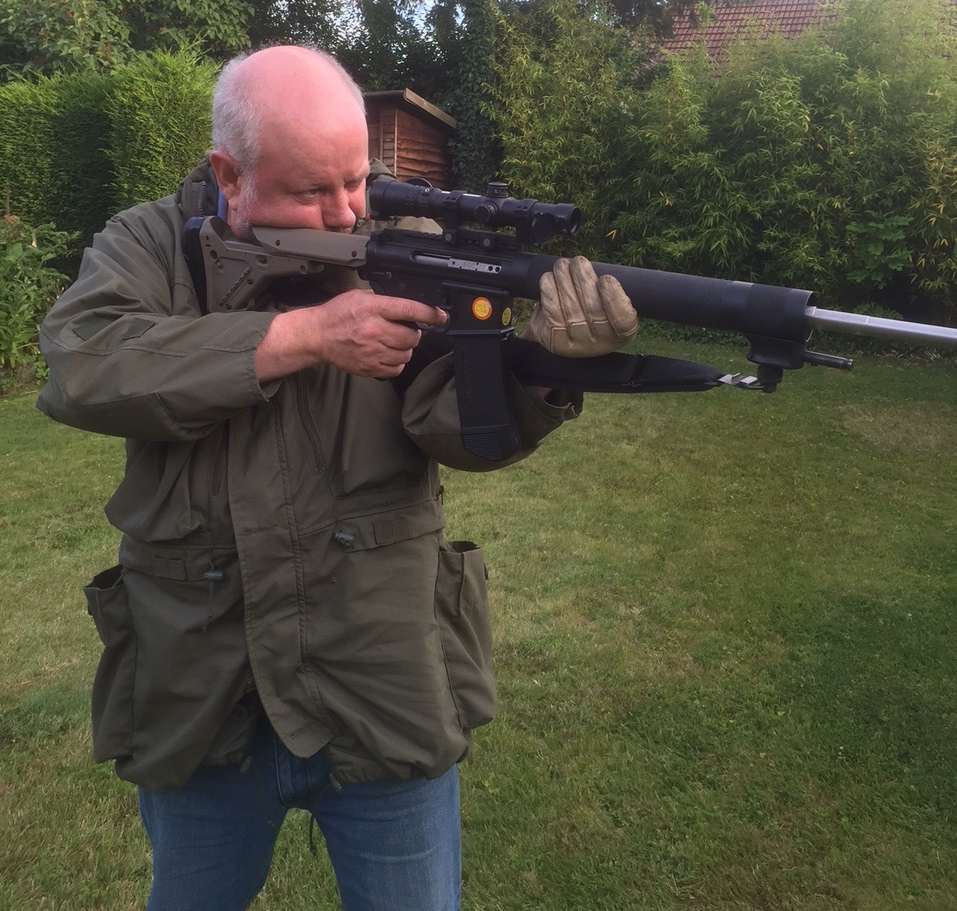
Start standing about two metres behind the firing-point and, on appearance of the targets for 15 seconds move forward, adopt a standing supported position on the right hand side of the post and shoot two shots at the left hand Fig 11, followed by four exposures of five seconds, two shots each exposure.
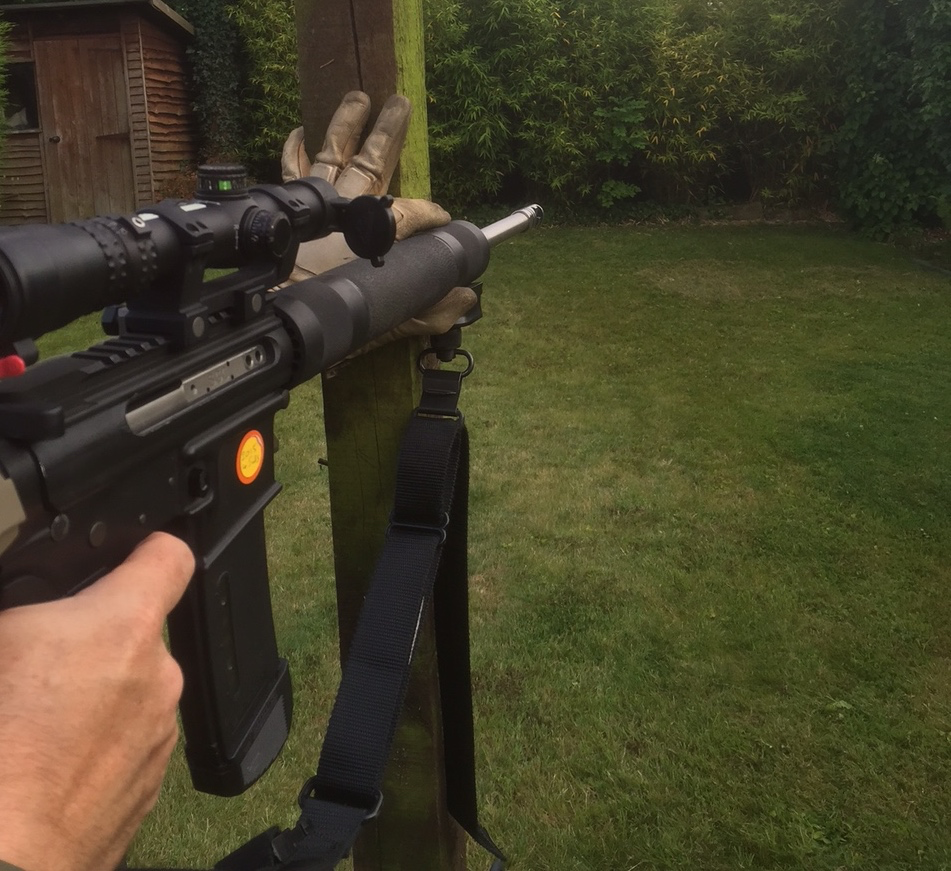
The trick here is to take a square on position to the post, feet square with your shoulders and lean in to the post supported with your left hand palm on to the post with your index and thumb gripping the fore-end of the rifle. Don’t let the side of the rifle touch the post as this will affect your zero, usually the elevation. The square on position helps because a more normal left foot forward stance can cause you to use the post as a pivot point and your shots end going left and right. (Pic 1)
75 yards kneeling or squatting supported
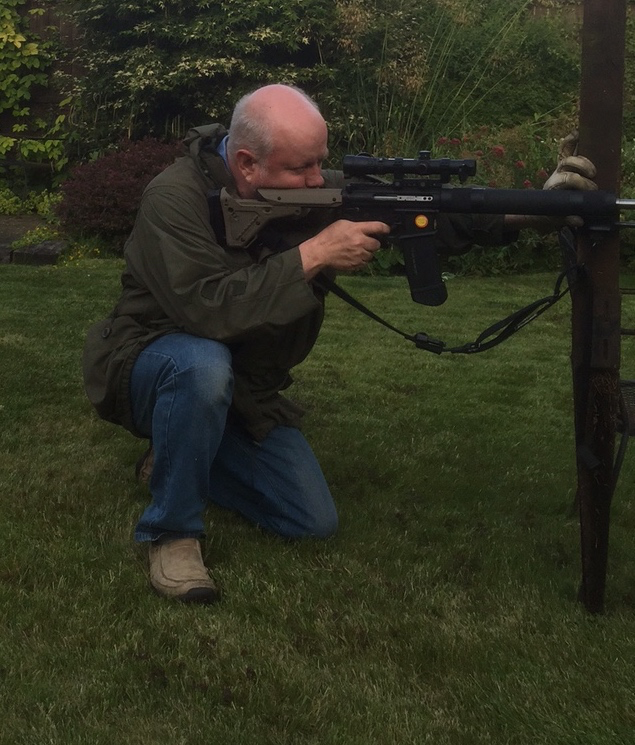
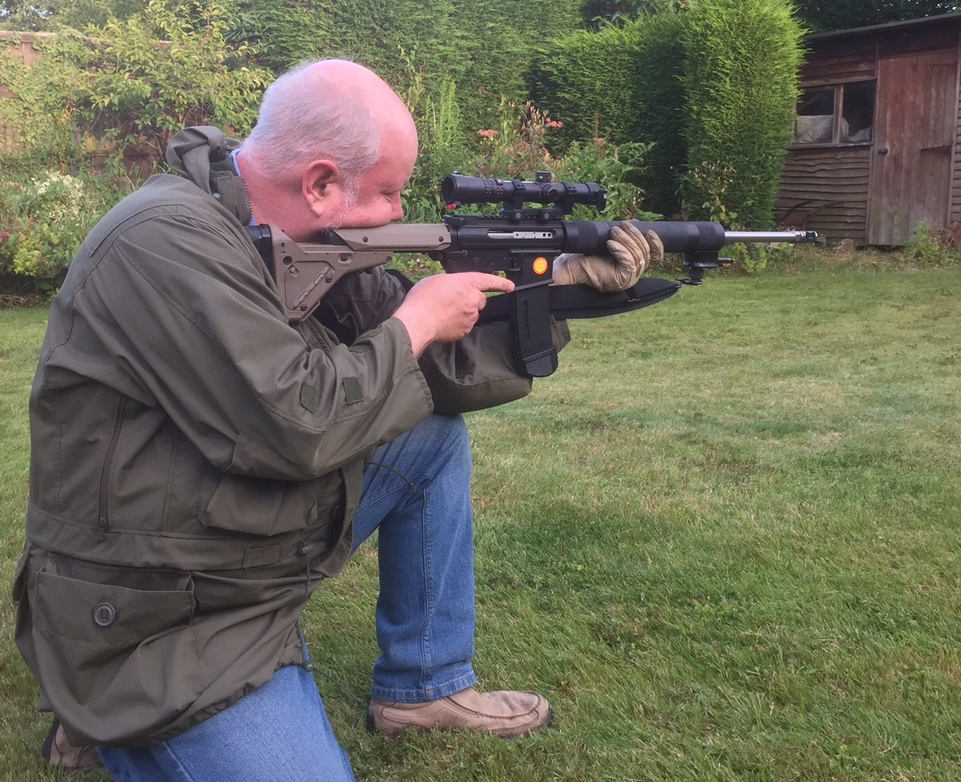
The appearance of the targets is the signal to move forward to the 75 yard point, adopting the kneeling or squatting position around cover. Your left hand can be placed palm to the post again but instead of kneeling on your right knee try kneeling on your left with your right knee acting as support for your right elbow. You now have two points of support – the post and your right knee. There are two exposures of 15 seconds, five shots on the right hand Fig11 on each exposure. (Pic 2)
50 yards standing and kneeling or squatting
The appearance of the targets is the signal to move forward to the 50 yard point, adopting the ‘standing alert’ position and on appearance of the upper Fig14 target for six seconds, fire two shots – one standing followed by one kneeling before adopting the standing alert position again. There will be four more 6 second exposures. You may find it beneficial to use a sling.
25 yards standing unsupported
The appearance of the targets is the signal to move forward to the 25 yard point, adopting the standing alert position and, on appearance of the lower Fig14 target for seven seconds, fire as many shots as you like. Adopt the ready alert position between the remaining two exposures, each again of seven seconds. Many shooters adopt a 3, 3, 4 firing sequence as the first two exposures allow you to gauge the timing before speeding up to shoot four on the last exposure. However, there are no hard and fast rules and if you have got a nice rhythm then shoot four shots if it feels right on any of the exposures. Again you might want to use a sling.
Slings
If you want to be successful in CSR learn how to use a sling! Sling types are the single-point, two-point or the Springfield type. For a number of years I have used a Quick Cuff sling supplied through www.tacfiresystems.co.uk This is an interesting sling because it combines the elements of a two-point sling and a single-point sling so that you get the best of both worlds. Different types have certain advantages depending on what position you are adopting. The Quick Cuff has a separate arm cuff with a female fastex buckle attached that you wrap around your supporting arm. The two-point sling that is attached to the rifle also has a male fastex buckle which allows it to be set up as a single point when attached to the cuff on your arm. A well-fitted sling actually helps you adopt a more consistent position and helps you recover from the recoil quicker. Therefore it is a good idea to use a sling even when using a bipod.
Sitting/Kneeling
Little to choose between a two-point or single-point but a single-point will need to be shortened from its prone-position length. A hasty sling is the best for the Urban Contact Match
Standing
Use a two-point or Springfield sling attached at the front and rear sling-swivels. With the two-point adopt a simple hasty sling by inserting your arm through and back round before gripping the fore-end. In the standing position this sling position will result in the rear of the sling resting across the top of your chest and therefore helps stabilise your position. You will have to lean backwards slightly to achieve this. You can achieve the same with the Springfield sling but use its forward loop through which you insert your arm and adjust the length of the rear portion of the sling to gain support across your chest. The great thing about this is that the sling also helps you support the rifle in the Ready/Alert position – rifle in shoulder, barrel pointing down at 45 degrees. You’ll be very grateful of the support the sling gives both when shooting and whilst waiting for the target to appear!
I use my Quick Cuff sling as a single-point when prone and a two-point for all other positions. It has the advantage that it will be adjusted for length in both configurations before the competition starts, without having to worry about adjusting it in the middle of a shoot – particularly during a run down when you have little time to make any adjustments other than to your sights!
Adjusting your sights
Depending on how high your scope is above the bore of the barrel, on an AR15 this is likely to be at least 2.5 inches or more, you will need to increase your elevation as you get closer to the targets. On my rifle that is plus 1.5 minutes for 50 yards and plus 6 minutes at 25 yards.
My big mistake was that the night before the competition I was fiddling with the elevation turret on my Nightforce NXS 2.5-10 x 24 and mistakenly turned the elevation down by a complete turn or 10 minutes. This equates to 10 inches at 100 yards as I found out to my cost on the day of the competition. My shots were just above the knees of the Fig11 – a nice tight group but well outside the scoring rings so only scoring two points per hit. The 75 yard target was little different so I had just dropped 60 points out of a possible 100 – consider that in this year’s championships 2nd,3rd and 4th places in the grand aggregate were separated by only five points! Thankfully, someone cross-shot on to my Fig11 target with five extra shots. This allowed me to have a re-shoot and I quickly turned the elevation turret a complete turn and proceeded to shoot the joint highest score of the day – my luck was in.
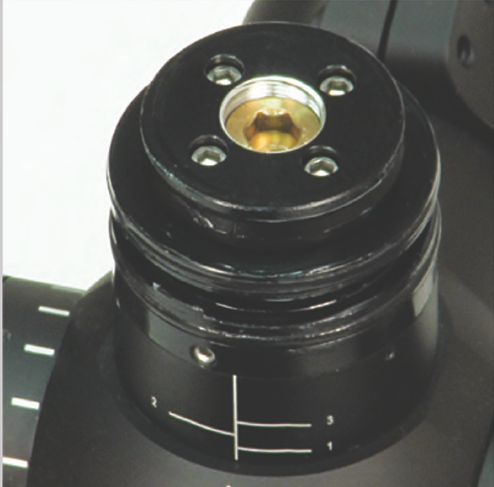

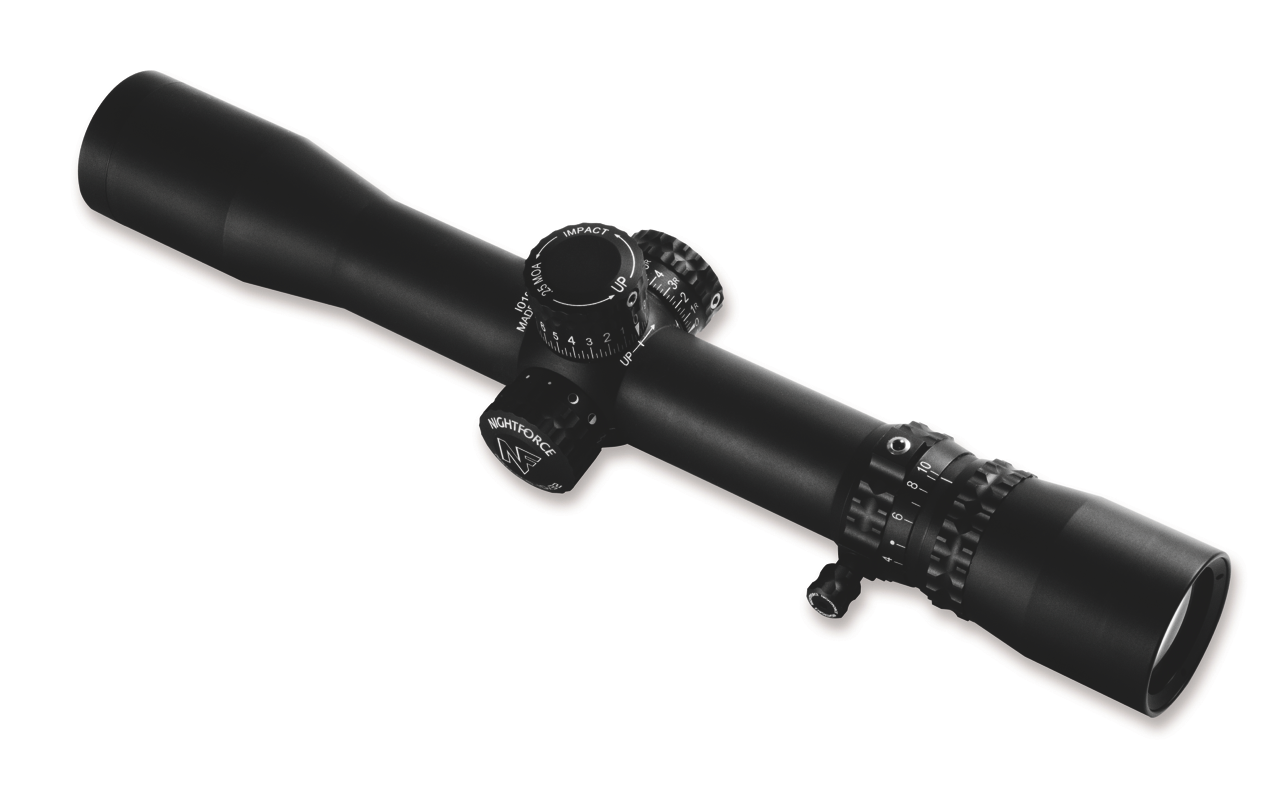
The Nightforce NXS
After the competition I actively looked at what was available on the market to prevent this from happening again. Luckily such a scope exists – the relatively new Nightforce NXS 2.5-10 x 32 with ZeroStop – a function that allows you to zero your scope at 100 yards and then make this your bottom-most setting. If you forget how many turns you’ve had – just dial down to the bottom and you have regained your zero – brilliant. I was already sold on the quality and functionality of my existing Nightforce so it was only natural to progress to the latest model. A 30mm tube plus an illuminated Mil-Dot reticule remains the same so the transition will be straightforward and the scope will still offer the optimum size-to-weight performance. There are three different reticule patterns available for this model. The scope’s features and magnification range make it the ideal scope for the two main rifle classifications of CSR – Service Optic (maximum 4.5 magnification) or Practical Optic where there is no restriction on magnification (but when you get down to 25 yards you’ll be pleased you can zoom down to 3 power). The current importer of the Nightforce scopes and accessories is The Sportsman Gun Centre. My thanks to them for supplying the photographs of the scope – now I just need to go out and buy one!