
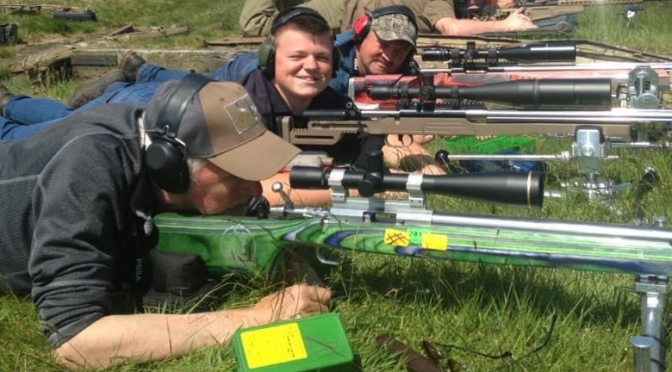
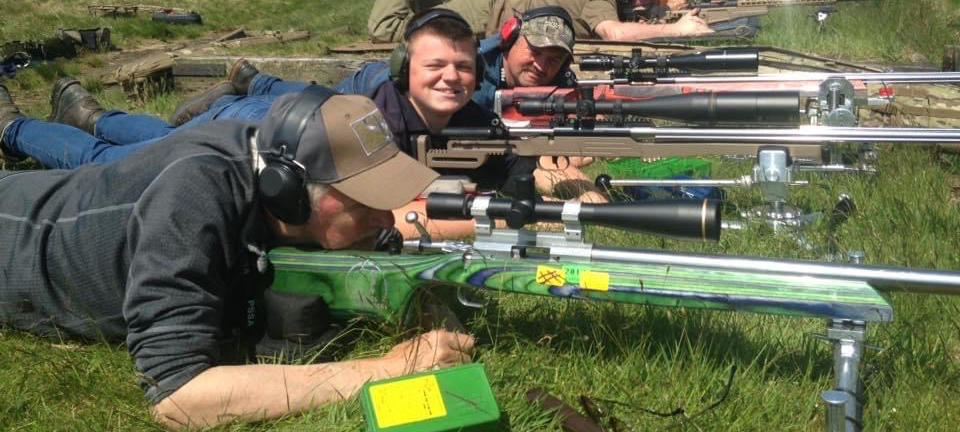
Tom is a sixteen year old still in full time education who, together with his Dad Frank, love their F Class shooting. He cut his teeth at Diggle Ranges where F Class competitions regularly pull in over 40 shooters. Gradually, Tom learned his craft and regularly began to beat his Dad! His ability and mature attitude to shooting soon earned the respect of his fellow competitors. Diggle also hosts a couple of GBFCA League rounds and Tom enjoyed the higher level of competition and tried to do as many League shoots as he could afford to attend. Here’s Tom’s story – Editor.
Last year, 2019, was my first full year of National F Class competition with the GB F Class League and I exceeded my expectations, even picking up the odd medal or two, finishing in 9th position overall in the League and placing 3rd in the Scottish Championship. Looking forward to 2020 – what if I had a full custom F Class Rifle built?
In September 2019, I signed up to complete my Duke of Edinburgh Gold Award. Having seen fellow junior shooter Bexi Parkin’s D of E build story (http://www.targetshooter.co.uk/?p=3000) it inspired me to do my own. The Gold D of E award comprises of five sections, one of them being the skills section. The aim of the skills sections is to broaden your understanding and increase your expertise in a chosen subject. Being a keen young shooter and an aspiring engineer, I decided on precision gunsmithing as my chosen skill.
There were many things to be considered before I could start my rifle build. The most important of those being – who is actually going to help me build it? Well, although there are many gunsmiths to choose from, it was not too tough a decision – fellow F Class shooters Stuart Anselm and Gary Costello, who together form GS Precision – have proved their credibility with F Class success at National and World level. Looking back over the years, I was astounded by sheer number of titles they have won, including 2009 F Open World Champion and 2011 FTR European Champion. It really gave me confidence that they know what they’re talking about.

Fortunately, GS Precision were keen to help and furthermore, Stuart was happy for me to be involved ‘hands on’ at every stage of the build and clear his work schedule to fit in with my school holidays. Now the gunsmith was confirmed, I just had to decide what components I was going to use. I had spent many weeks carefully researching this with the help of my fellow shooters. The action was the first component to be decided and, after scouting the firing-line for shooters’ opinions, there was one clear preference – the BAT Model M.
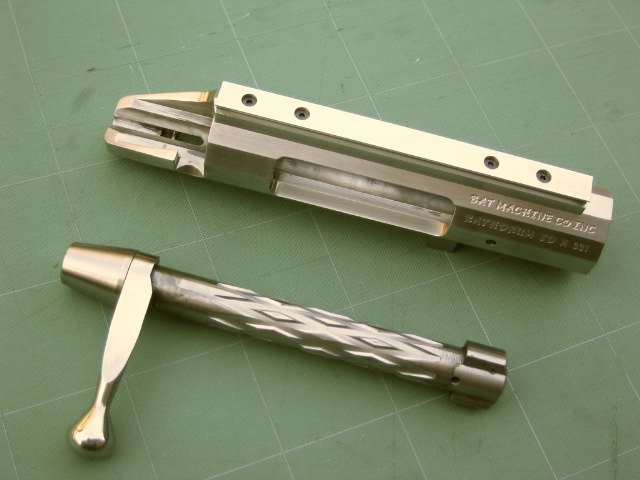
Having a very limited budget I was sceptical as to whether I could afford a BAT but, at the same time, I didn’t want to compromise with this critical component. A ‘blessing in disguise’ came along in the name of benchrest shooter Tony Lenton. I had put the word out on the UK Varminting forum that I wanted a BAT action and Tony came to the rescue. He had a BAT Model M right-bolt, left-port complete with a Jewell BR Trigger in brilliant condition that was surplus to requirements. This all came with an amazing price tag, so understandably I snapped up his offer.
Next to be decided was the barrel and calibre choice. After seeing Gary Costello and German shooter Ulrich Kwade’s amazing performances in the 2019 GBFCA National and European Championships, I decided to give a Benchmark barrel a try. GS Precision is the UK importer and Gary ordered me a Benchmark 1-9.5” twist, 1.25”-1.0” profile special cut barrel.
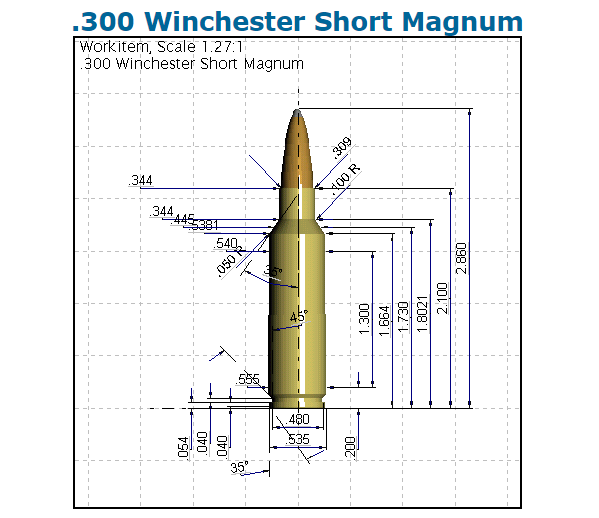
In F Open, it seemed like there were three favoured choices of cartridge – the 7mm RSAUM, 7-270 WSM and the mighty 300 WSM. I decided to go all out and went for the 300 WSM, with the plan of using the Berger 215 grain Target Hybrid bullet.
Now I felt like we were getting somewhere but, a rifle wouldn’t be complete without a stock. Like every component, there were many options to choose from, including Cerus, Joe West, Precision Rifle & Tool, McMillan, Dolphin – the list goes on. I have already owned two Joe West stocks that I really like but I decided to try something different since this is my ‘once in a lifetime’ opportunity. In an ideal world I would have loved a Cerus because let’s face it, who wouldn’t want a Cerus masterpiece to show off on the firing-line? But, I had already comprised a substantial chunk of my budget for the BAT action so the Cerus was out of my price range.
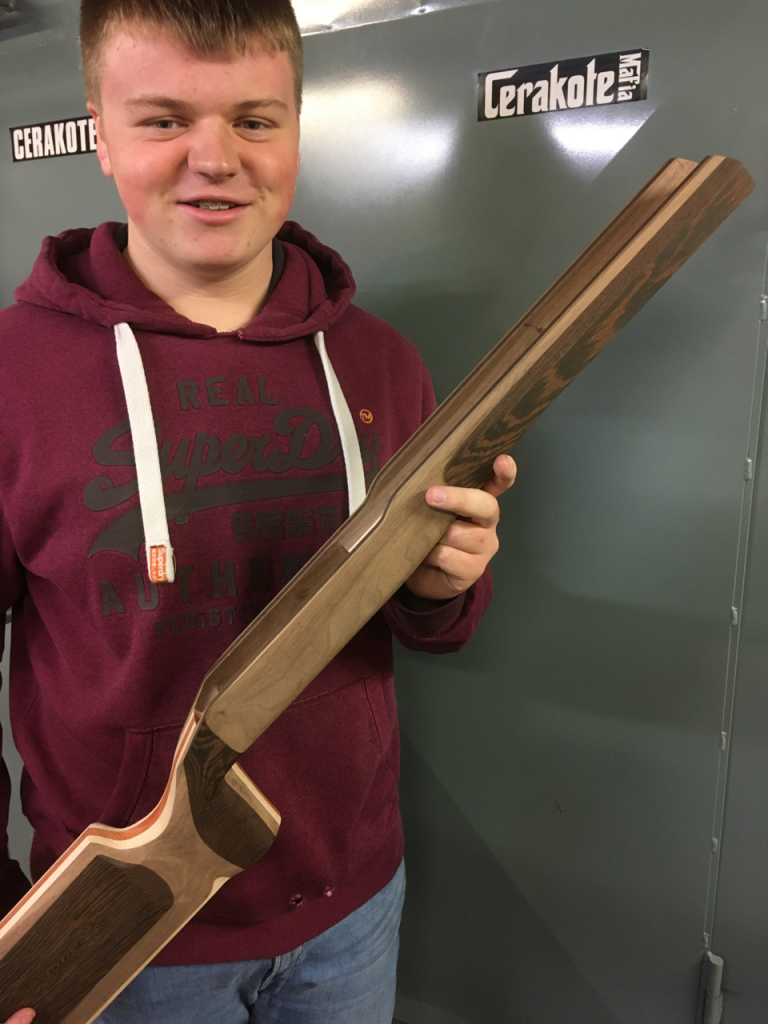
Fortunately, a new stock-maker came along – Ukrainian F Class Shooter Dima Grymalyuk. He displayed a range of F Open stocks at the Bisley 2019 Europeans and you can see them on his Facebook page. His stocks are made from laminates of some of Europe’s finest hardwoods. Gary bought half a dozen off Dima and let me take my pick. There was one that caught my eye. It’s a combination of walnut, wenge, maple and paduak, so I went for that one. https://www.facebook.com/pg/Dimariflestock/photos/
Now that the main components had been chosen, there were still a few extras that needed to be decided. I also added on a RAD – Recoil Absorption Device, a PDT Ezell Tuner, BAT trigger-guard and a stainless-steel 20 MOA BAT Picatinny rail.
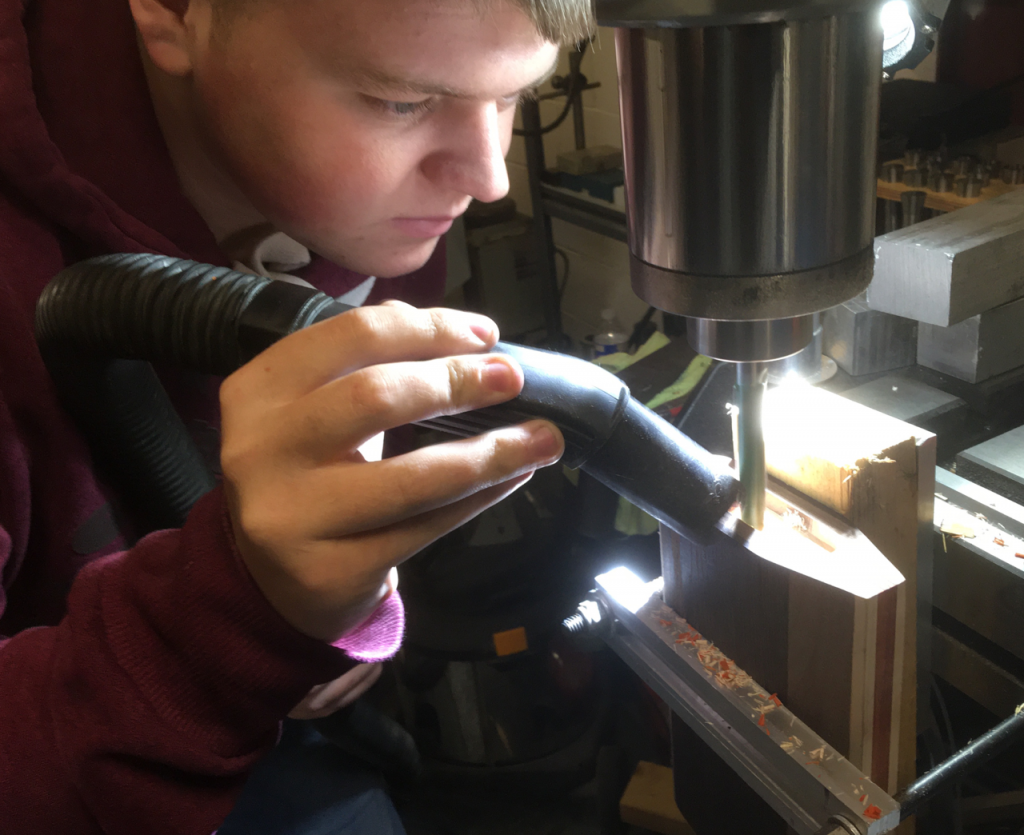
February’s half-term gave me the perfect opportunity to start my build. I arrived at Stuart’s workshop bright and early to start work. The first job was the barrel work. This included trueing-up the barrel in the CNC lathe chuck, chambering, threading the tenon and crowning. Stuart talked me through the trueing-up process using a dti run-out gauge to ensure the barrel was true to within 1/10,000 of an inch. This is a very important process but, being well experienced in such matters, Stuart did it in no time.
We faced-off the end of the barrel to ensure we had a nice perpendicular datum to work with. The next job was chambering. Stuart fitted the tight-neck 300 WSM reamer into the floating reamer-holder in his CNC lathe and showed me the ropes. The Benchmark barrel cut like a hot knife through butter with nice size chips falling out. I chambered the barrel in small increments and flushed the chamber after each pass. We sunk the reamer deep enough into the barrel until the go-gauge was flush with the face of the barrel and then flushed the barrel from the muzzle end to remove any remaining chips from the bore.
Stuart then demonstrated the programming of the CNC lathe to cut and thread the tenon. With BAT actions featuring such tight tolerances, Stuart can use the same programme for every BAT Model M – another one the many beneficial features of CNC machinery. Stuart talked me through the various stages of the CNC programming, including how to set the X and Z zero points and how to programme the tool table. We then did a ‘dry run’ of the programme to ensure there were no errors in the coding. Now for the real thing.
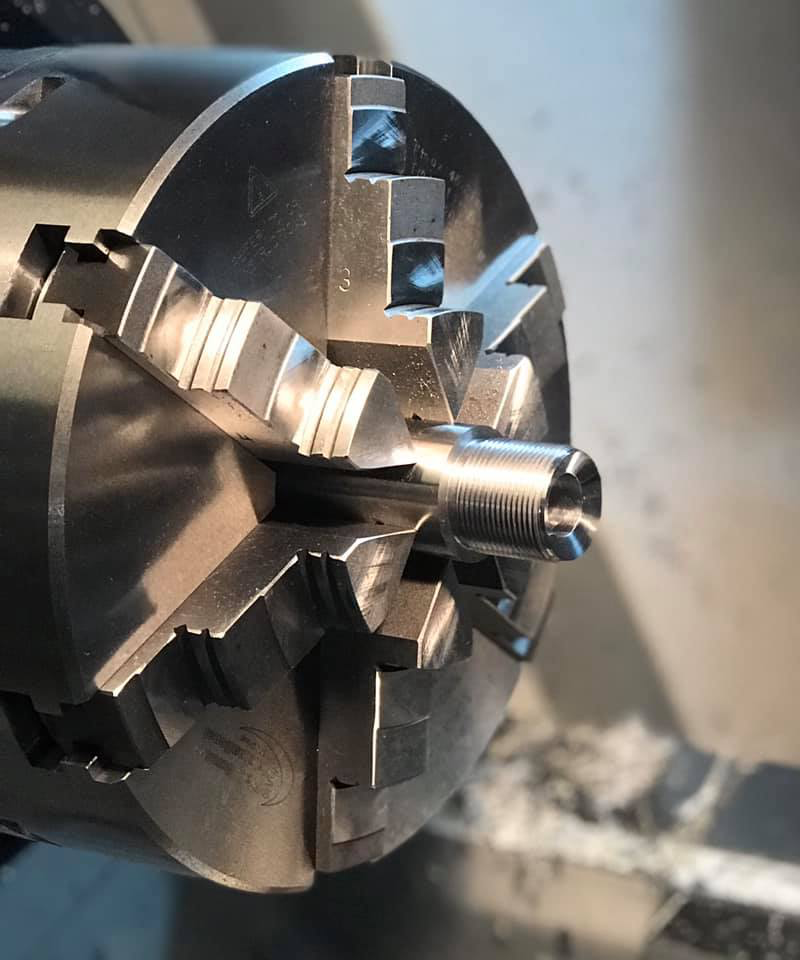
Watching the CNC effortlessly and rapidly cut my tenon and thread it just a few minutes was mind-blowing and clearly demonstrated how CNC machinery can be used to its full potential in gunsmithing. After that, we cut the 25 degree chamfer into the face of the barrel to match the angle of the coned bolt-nose. We screwed the action onto the barrel and checked the ‘go’ and ‘no go’ gauges. With a few small tweaks to the bolt-nose clearance, the main chunk of the barrel work was complete.
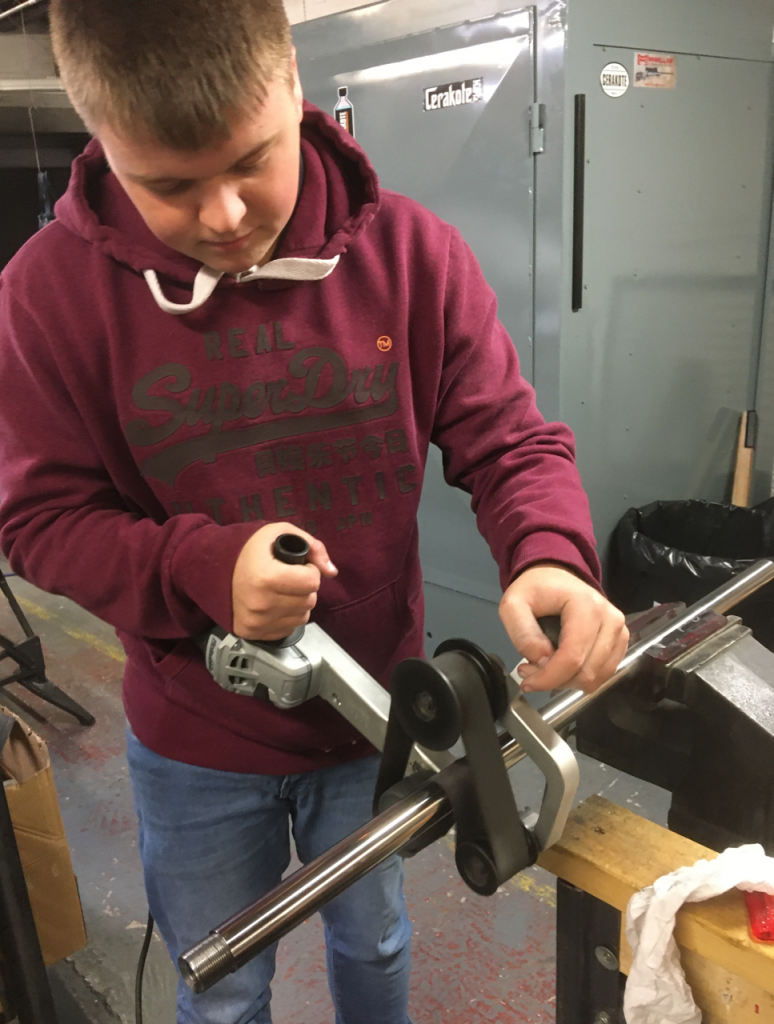
To finish off, I polished the inside of the chamber and the face of the barrel-cone with different grades of wet & dry paper to achieve a near mirror finish. Next, we flipped the barrel round, clocked it again and cut an 11 degree crown on the muzzle. We then removed the barrel from lathe and I started polishing the surface of it with GS Precision’s new barrel polishing device. After an hour of polishing I was satisfied with the result.
The next day we started on the stock work. The stock was securely clamped into a vice on the milling bed and carefully marked out where we wanted to bed the action. We set the X, Y and Z zeros on the DRO and started inletting the main area of the stock. The CNC went to work and I had the important job of being the ‘dental hygienist’ – standing there with a vacuum cleaner removing the waste.
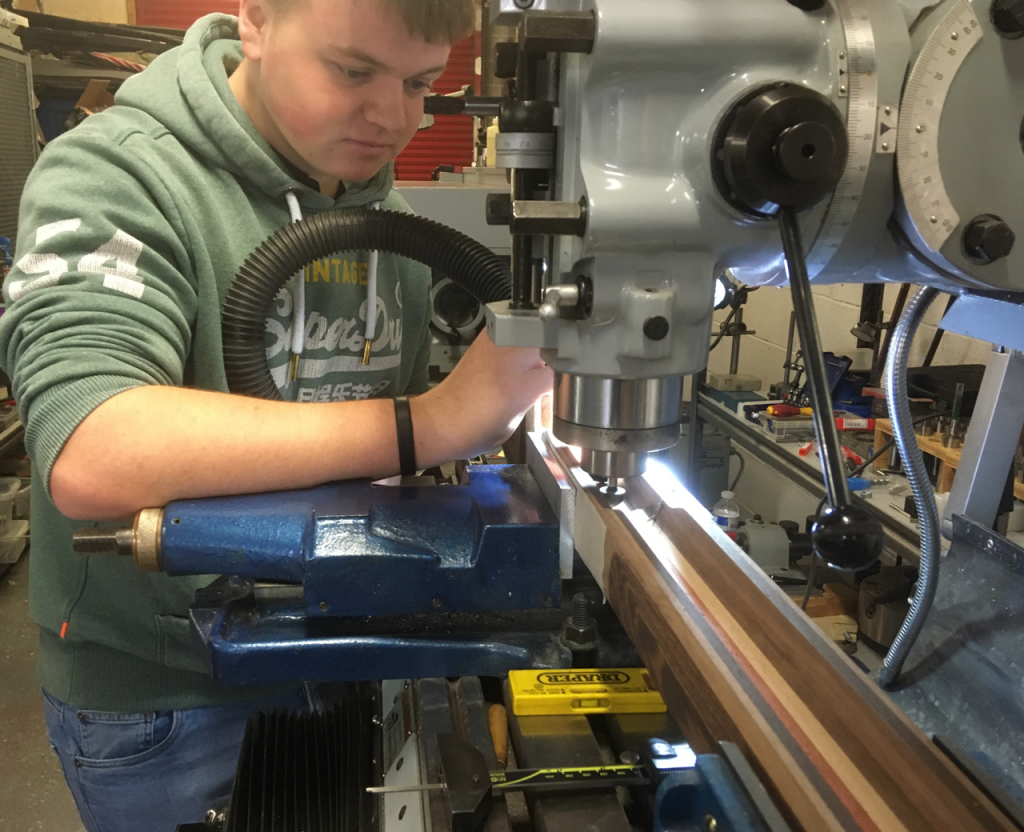
We then milled out three holes for the pillars and a rectangular pocket for the recoil block. We took measurements of the pillar-hole depth and made some custom pillars on the CNC lathe using an idea from Ulrich Kwade – 2019 European F Open Champion and very experienced engineer. His idea was to make ‘top hat’ pillars, which meant they were all set to a precise depth and wouldn’t move during the bedding process.

Final job on the mill was to inlet the butt of the stock to accommodate the RAD system. This is where the CNC mill came into its own element. With a few lines of code, the mill quickly cut a precise deep pocket to fit the RAD perfectly.
Now for bedding, the ‘fun’ bit. We removed the trigger-hanger from the action and applied a thin coat of release agent to the surface of the action. We then filled all the open areas with putty to keep the bedding compound out of important areas. Stuart showed me how to mix the bedding compound – this is a messy job if you aren’t careful! We masked around the stock inlet to achieve those nice bedding lines and then applied a layer of compound to the inletted area of the stock. We screwed the pillars to the action and clamped it into the bedding. We removed any excess compound from around the action and left it to cure – for 5 days!
We came back after the weekend and started on the remaining stock work. Firstly we pulled the barrelled-action out of the bed and cleaned the action to remove any trace of bedding putty. Back in the mill, we inletted the stock to fit the BAT trigger-guard and the ‘buttons’ for the screws. We spun the stock over and milled out a slot for the ejection port, bolt-release, bolt-handle and a small groove in the butt of the stock to clear the bolt shroud to facilitate removal of the bolt.
The stock was then sent to a local automotive shop for lacquering and the barrelled-action taken down to the Birmingham Proof House. But then the inevitable happened – COVID-19 has brought my build to a standstill. At this stage I’m not sure when I will get my hands on it again but, rest assured, Stuart and Gary have kept me fully updated. Hopefully it won’t be long until we can continue.
Stay tuned for Part 2 where we’ll be finishing the stock work, fitting the barrel-tuner and load development.