In parts 1 & 2 we looked at rifles, scopes and other essential equipment needed to compete in F Class competition but today is the day of your first match – which will probably be with your friendly local club and hopefully at no more than 600 yards.
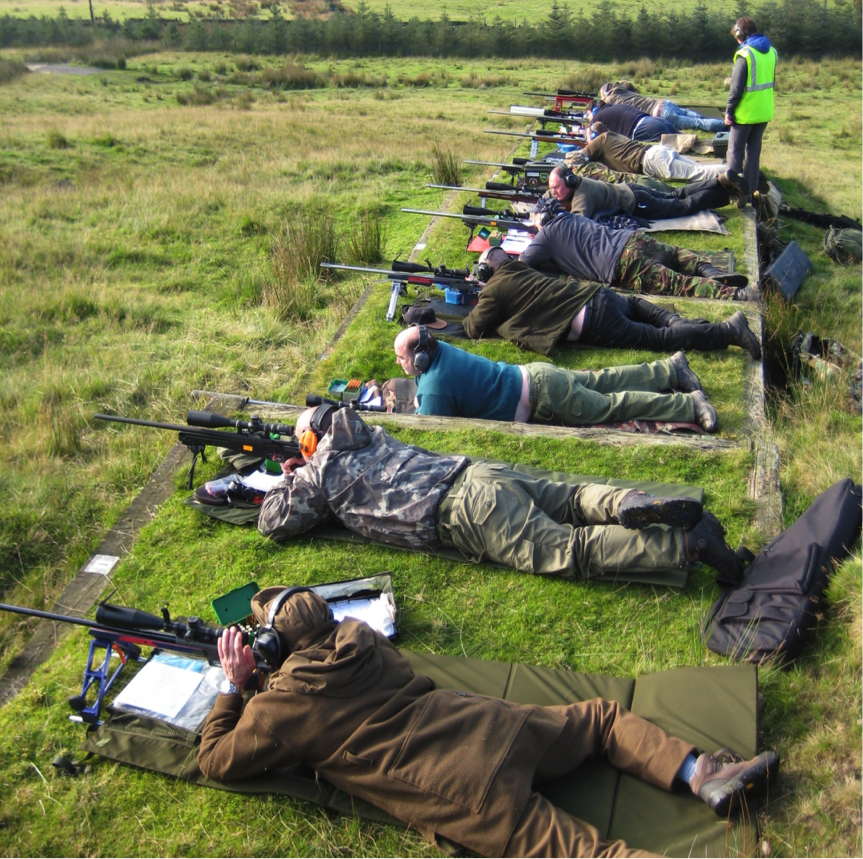
You will normally be squadded in pairs – or even threes. In Britain and other Commonwealth countries, this is the way we shoot. In America, they prefer to ‘string’ shoot – each competitor shoots individually, with a given time to complete the shoot. How you use that time is up to the shooter – when the wind dies you bang off as many shots as you can – when it lifts, you stand down for a few minutes until your ‘condition’ (hopefully) returns and carry on shooting until your course of fire is complete.
String shooting arguably requires less wind-reading skill – the most reliable wind indicator is your last shot marked on the target. Simply compensate for any error with your next shot and, if the wind is holding, it should be a bull – it’s called ‘chasing the spotter’.
Shooting in pairs is a whole different ball-game. There will be two or three minutes between your shots and, as you take aim, your partner’s spotting-disc will be visible on the target – but where did he aim? How much wind did he wind-on? You don’t know so it’s imperative that you make a stab at reading the wind – but more of that later, we aren’t on the firing-point yet!
Setting up
So, you will – under the instruction of the RO – begin to set up your equipment. Wait for the RO’s instruction before un-casing your rifle. The mat is the first item – if the grass is wet at least you can now kneel on your mat to set up the remainder of your gear. If you are a right-handed shooter with a right ejection/feed port then your score-card, plot sheet and ammunition should be placed on the right to minimize movement.
Other essential equipment – back-bags
In addition to the rifle’s front support (which we covered in pt 2), the butt is supported by a bag, filled with some sort of granular media. For the benchrest shooter, the back-bag is a ‘rock’ – it’s as heavy as practicably possible and it sits solidly on a nice, flat concrete bench. That’s how it should be – throughout the benchrest course of fire the bag stays put – rock-solid – as the rifle recoils. If the rifle’s aim needs to be shifted, it’s done on the front rest – that back-bag never moves. Benchresters’ bags are usually made of leather – sometimes with Cordura ‘ears’ to guide the rifle under recoil – and filled with Zircon – a very heavy sand. A Zircon-filled bag will typically weigh 15lbs or more.
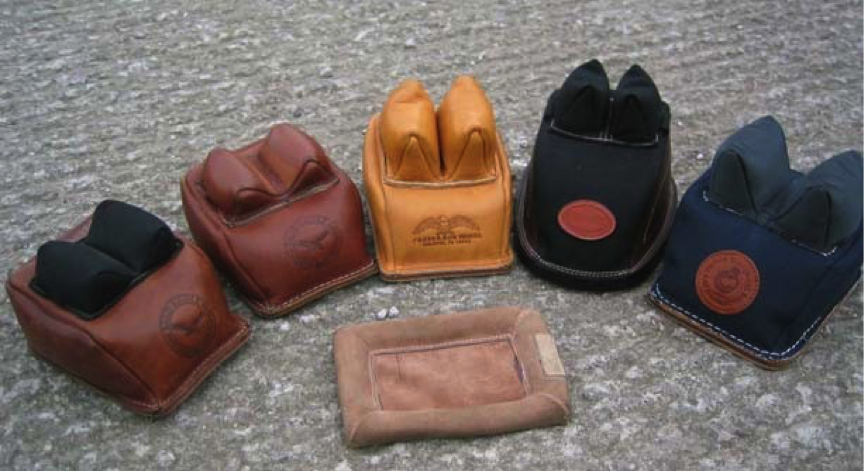
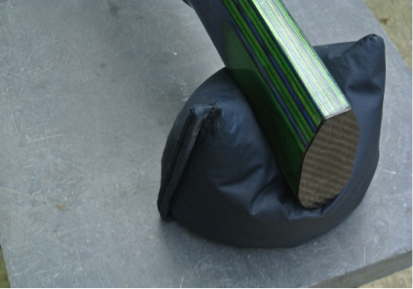
Lots and lots of rear bags to choose from
A solid stable back-bag is also the desire of the F Class shooter – except that the ‘effer is shooting off a padded mat which in turn is covering grass, sand or even stone on the firing-point. There is no way to achieve the benchresters’ ‘rock’. Many have tried – you will see mats with holes cut in them – so the bag at least sits on the grass, you will see bags placed on a variety of ‘bases’ – not all are recommended…….
…….a solid, stable platform
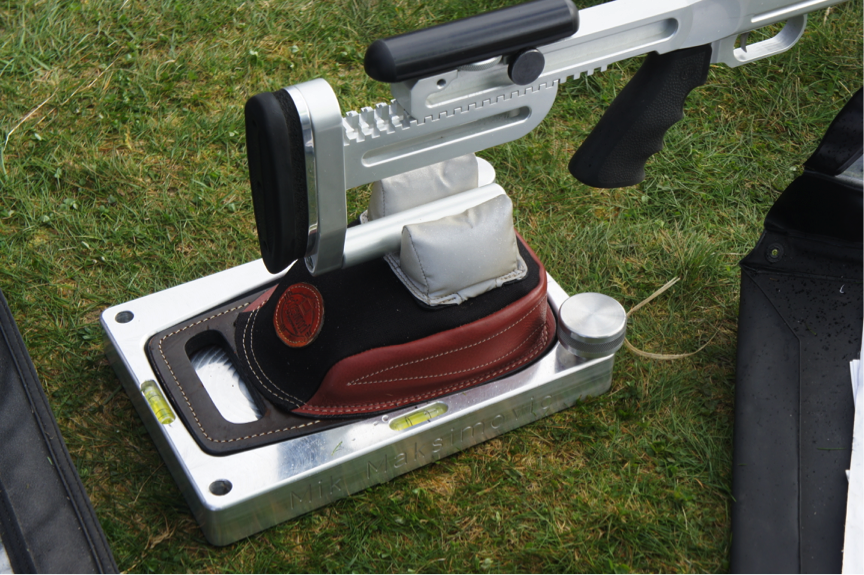
Probably the ultimate butt support – from Edgewood and Dolphin
The Open Class shooter has a chance of a decent set-up but the FTR shooter doesn’t shoot off one of those fancy, shiny joy-stick front-rests, he shoots off a bi-pod. And, no matter how sophisticated the bi-pod, it still hops and slides around under recoil. Look through the scope after firing a shot and often, you are not even looking at your own target. So, to get back on target, the simplest way is to shuffle the back-bag! It is no longer a ‘rock’ – it’s now a wobbly unstable thing!
Constant moving of the bag means that it will inevitably be anything but a stable platform. Vertical stringing is often the result – with the odd shot going high as the bag settles – until the next shot that is, when you shuffle it again!
So what can we do about it? How can FTR shooters get a better set-up? Well, we take a lesson off the benchresters again. In the dim and distant past, when benchrest was in its formative years, those fancy front-rests weren’t quite so fancy but simply a basic pedestal – all windage and elevation movements were taken care of with the rear-bag. Some top benchrest shooters still shoot like this – we call ‘em ‘bag-squeezers’.
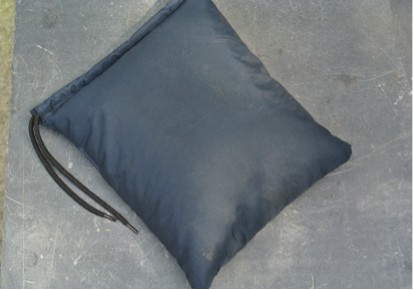 A simple bean-bag works better than you might think. Make your own – fill it with plastic pellets, sand or even rice!
Bag-squeezing works and works very well – providing you have the correct bag and you can squeeze and hold the bag without allowing the slightest movement as you take the shot. Takes practice but, once mastered, bag-squeezing is very effective. Need convincing? Probably the UK’s most successful FTR exponent is former World Champion Russell Simmonds. Russell won the World FTR Championship in 2009 bag-squeezing – need any more convincing?
I advise you to explore both options – any shooter will be happy to loan you his bag for a shoot. A simple ‘bean-bag’ will better ‘mold’ itself to the uneven mat or the ground you are shooting off and you’ll find that minute movements obtained by a light squeeze of the bag will translate into several feet of movement of the crosshairs on the target. It’s a very effective – and quick – way of adjusting aim.
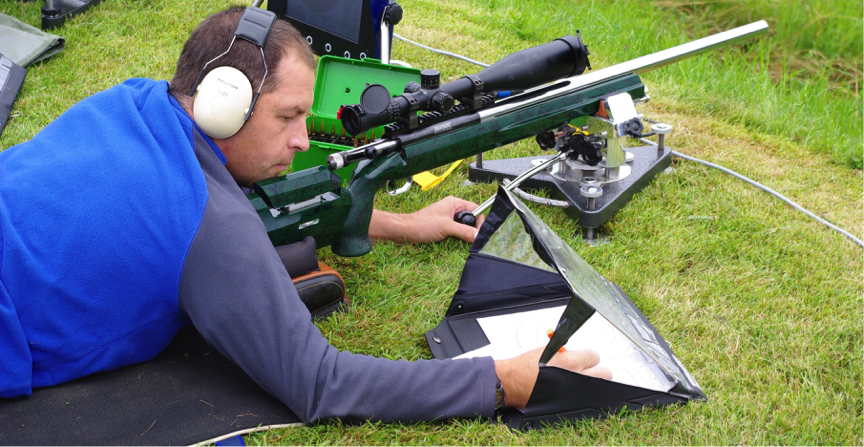
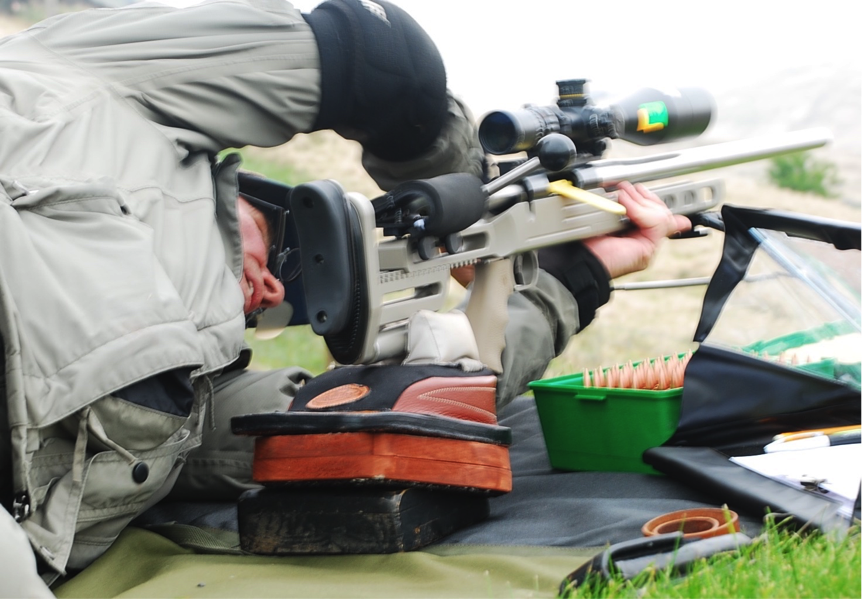
This shooter is demonstrating a perfect set-up. Note rear bag on the grass, ammo on the left as the shooter has a left ported rifle, plot-sheet and score-card under the Weather Writer on the right
But, let’s get back on the firing-point. If the RO has given the order to set up rifles, you can now un-case it. If you’re shooting off a bipod, you will need to fix it to your rifle at this point.
If you are an Open shooter using a machine-type front-rest, set this up carefully, weigh-up the position of your target and place the rear bag so that the three are in-line and the front-bag/rest is exactly at right-angles to the rifle.
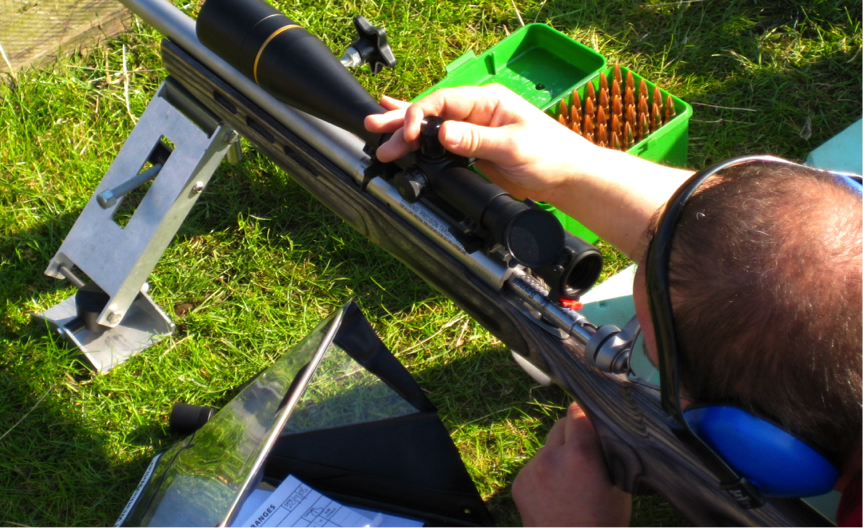
Now, make any adjustment to alignment before you even look through the scope. Elevation will also need to be set and again you can do this initially by looking along the side of the barrel and getting the barrel pointing roughly at the target. When you finally lie down behind the gun and peer through the scope, if you’ve done your work properly you should be somewhere close to your target. It sometimes helps to turn down the scope’s magnification a little.
Now settle the rifle in the bags by thumping the butt-stock to bed it into the rear bag and ‘sawing’ the rifle fore and aft to get it ‘tracking’. If you’re shooting off a machine-rest, don’t over-tighten the front bag. If you’re shooting off a bipod, get the bipod feet tracking in the grass so that they are running on something a bit more solid than springy grass. Remember this – SET-UP IS EVERYTHING! Compromise on set-up and you will suffer on the target.
The shoot
If you’re not acquainted with your assigned shooting partner, introduce yourself. Confess that it’s your first shoot and he’ll hopefully ‘go easy’ on you. Swap score-cards and wish him luck. Once the RO gives the ‘commence fire’ command, the shooter on the right will always fire the first shot. Normally, a couple of sighters are allowed and sometimes blow-off shots – to foul the barrel – may be permitted. A competition will normally need fifteen or twenty scoring shots plus sighters. Make sure you have enough ammunition and always take a spare round or two – if an unexpected ‘cease-fire’ is called you may be permitted another sighter prior to re-starting.
This is your first shoot and things may not be going as well as you’d hoped but, you must ensure that you are doing one thing correctly – marking your partner’s score-card! There is nothing more embarrassing than to find you’ve missed a couple of his shots when you come to tot-up at the end of the shoot!
That’s the mechanics of the shoot – properly setting-up and sending rounds down range but, how do we ensure that those rounds land somewhere close to where we were hoping they would? The first thing we can do to help this happen is to always fire the ‘perfect’ shot. The perfect shot may not land where you hoped it would but, at least you will know that it wasn’t your fault – it was your best effort – you can truthfully blame it on the wind!
The perfect shot? We’re back to set-up – don’t ‘force’ the rifle to get on your aim-point – make sure it’s set up and ‘tracking’ properly before you pull the trigger.
The wind!
Yes, the wind is the greatest enemy of the rifleman – or is it? I’m reading a book at the moment written by one of the world’s greatest shooters and on the frontispiece are the words “The wind is my friend.” I must admit, I’ve never thought that! All my errors are down to the wind – or at least my inability to read it properly. But then again, aren’t everyone’s errors down to the wind? So, if you do well – maybe the wind was your friend that day.
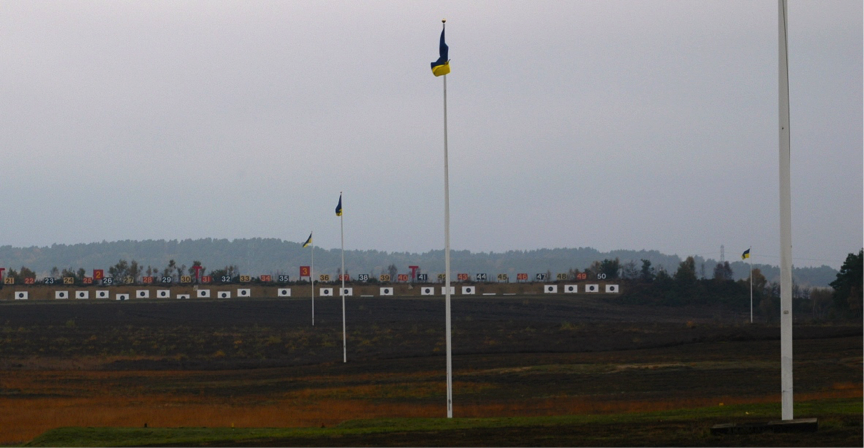
How can we ensure that the wind is always our friend? Our first help comes from the range windflags. On some ranges, these are arranged in a grid-pattern on a relatively flat field. This is good. On other ranges, the flags are dotted about here and there. They are not on the line of flight of your bullet so are they of any use? Initially, we must seek out the flag that is doing the ‘damage’ – not easy.
We must make use of every wind-indicator we can – including the spotting-discs on the targets either side. If you see near-identical ‘wide’ shots on your competitors’ targets and you hadn’t spotted a wind change – then look again! We must keep records (plotting) and try to build up a picture of what is occurring. You must learn something from every shot – good or bad.
Making bold wind-calls takes a lot of ‘bottle’. Let’s say the targets either side of you are both showing ‘twos’ well out to the left. The wind blowing from the right has clearly picked up – did you see it on the flags? What are you going to do? Are you bold enough to wind-on an extra 2MOA? Most shooters will play it cautious and add maybe a minute and OK, if it was really a 2MOA pick-up, they end up with a four on the left – not a disaster.
At club level, making bold wind-calls is good fun – especially when you get it right but, in a big national or international competition, it’s really gripping! But, isn’t that why we do it?
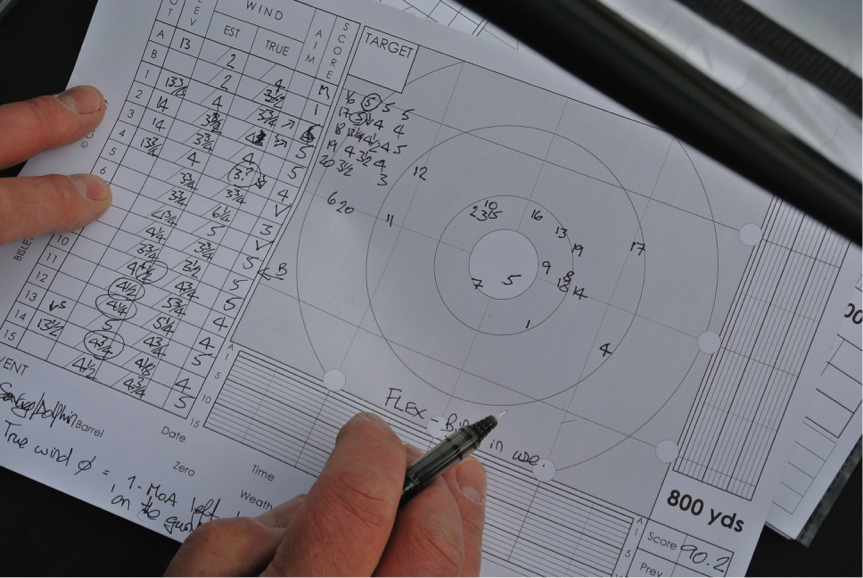
This sheet clearly illustrates the value of the plot. Look at shot 6. Shot 5 was a V bull with a wind value of 33/4 MOA but the shooter failed to spot the wind-change – a pick up of 21/2 MOA – and scores his only 3! He adjusts – but only by one MOA for shot 7 (the wind had obviously dropped again) and is back in the V bull.
For every shot you fire you must record some information. If you don’t, then every shot will be like your first sighter – hope and pray! Surely you can do better? There are two ways to adjust for wind changes – aim-off or adjust the scope. In either case, you MUST record what you did and where the shot landed – this will then tell you your wind-reading error! Invaluable information for your next shot!
If you choose to adjust your scope for each shot, then you will always be aiming at the bull so it is imperative that you record your scope adjustment on the plot-sheet. If you don’t, you will inevitably get lost……
Every scope adjustment MUST be recorded on the plot sheet, otherwise you will soon be ‘lost’.
If you choose to aim-off – rather than adjust your scope – then you will need to record on the plot sheet exactly where you aimed and where the shot actually landed. Information – that’s what we are after. By keeping records and plotting the fall of every shot and scope adjustment, we slowly build-up a ‘wind’ picture. Some shooters even have time to plot a graph of the wind changes. If your last ten shots score higher than your first ten – congratulate yourself – you learned something about the wind and put it to good use!
Unfortunately, for your first shoot you will probably find that you have so much to think about that you haven’t time to plot – big mistake! You have plenty of time. No one is rushing you. Relax, plot and try to enjoy your shoot – though this is often difficult if your partner is banging in V-bulls and you are floundering in the twos and threes! But, we all had to start somewhere. Set your own goals and don’t worry too much about your opponents – you cannot influence how they shoot.
Firing-point etiquette
Shooters are a friendly relaxed bunch – unless things are going badly! There are a few do’s and don’ts. I like to chat but some shooters don’t – so don’t be overly chatty. Offer a word of praise if your partner shoots a V bull – “Well shot” or similar will suffice. Don’t cheer too wildly when you get a V bull – even if it’s your only one.
As you mark down your partner’s score, call it out “Shot nine is a five” – just to let him know you’ve recorded it. Always offer ‘compliments’ to the target markers via the RO on completion of your shoot – even if they were terrible. We can’t run shoots without markers.
Thank your partner for an enjoyable shoot, smile and congratulate him (through gritted teeth if he beat you). If other shooters are still shooting after you’ve finished then, with the RO’s permission, quietly remove your gear from the firing-point – after proving each others’ rifles ‘clear’ of course.
Setting goals
For your first shoot, getting all shots away cleanly and landing them on the target can be deemed a success. If you managed to plot, all the better. You will probably have ‘explored’ the whole of the target with even ‘ones’ and ‘twos’ recorded. So, your next goal is to try and eliminate those ones and twos – try and keep all your shots within the ‘three-ring’ or better. As you progress you can refine that even further and strive to keep them in the ‘four-ring’. Yes, even our top shooters will have the occasional annoying ‘three’ but when you start to turn-in scores in the eighties (out of a 100) you have arrived! You are now an F Class shooter.
You next goal will be to break 90. This means that at least half of your shots will be bulls! The F Class target is very small, very un-forgiving. To achieve scores in the nineties on a regular basis it goes without saying that you will need to be using a very accurate rifle, a good set-up and impeccable hand-loads – there is no room for compromise at this level.
Your plot-sheet will be a good indicator of the quality of your hand-loads – your elevation plot should ideally be within a minute of angle – i.e a half MOA above or below the centerline of the target – yes, the wind will always punish you but you don’t want to be giving away points to elevation issues. Elevation issues are almost always down to careless shooting, poor set-up or so-so ammunition.
Finally, note down your elevation settings for each range you shoot at, then next time, you can use those two sighters to gain some valuable information on the wind rather than ‘exploring’ elevation. Many shooters will ‘zero’ their scope at the end of every shoot – in other words return the elevation turret to the 100 yard zero and similarly zero the windage turret. Cuts down the chance of making silly mistakes.
It’s not a bad idea to review your plot sheet when you get a minute. See what lost you points – were you missing wind pick-ups or let-offs? Is your elevation under control – not too many low or high shots?
And remember – the wind is your friend!